Overview
Overall Design
Design Notes
Theme Settings
Width, Style, Slider, and Footer
Font
Theme Colors
Currency Options
Header Area and Logo
Logo
Top Links
Dropdown Navigation Bar
Home Link
Category Links
Search Bar
Additional Content Block
Item Detail Pages
Tabbed Item Details
Informational Content Block
Related Products
Footer
Simple footer
Informative footer
Applying a Background Image to Your NRO Store
Image Sizes
Category Image Sizes
Slideshow Images
Item Images
Placeholder Images
Clearing Cache
What is Cache?
Clearing Cache
Errors
Admin Panel Error: "An error occurred while saving this configuration”
A theme defines the overall look and feel of your NCR Retail Online (NRO) website. Themes control all visual aspects of your website, including CSS and template-level images, as well as many functional aspects of your website, including which default blocks are available and what data is shown throughout your site.
Learn more about working with themes:
http://www.magentocommerce.com/design_guide/articles/working-with-magento-themes/
Design Notes
- The width of the Celebrity theme is 1010px
NRO Admin Panel: System / Configuration / NCR Retail Online / Theme Settings
 TIP:
TIP:
After making changes to your website theme, you may need to refresh your cache in order for the changes to be reflected in your online store.
NRO Admin Panel: System / Configuration / NCR Retail Online section / Theme Settings tab
In the Appearance section of the theme settings, you can customize the basic layout elements of your storefront including:
-
Width
: Choose whether or not the background colors of the header and footer areas expand the width of the viewer's screen
-
Style
: Choose a light or dark color palette; you can customize the specific colors in the next section
-
Slider
: Choose what type of items you'd like to highlight on your home page, either Latest Arrivals only, or both Latest Arrival & Sale Items.
Learn more
about flagging items as 'new' and 'sale'.
-
Footer
: Choose from a simple footer section, or a more informative footer section that includes multiple columns of links.
NRO Admin Panel: System / Configuration / NCR Retail Online / Theme Settings
Select the font you wish to use as the accent font throughout your website. The accent font is used in the dropdown menus, template headings, tabs on the item detail pages, buttons, and more. To see samples of each font, select the font from the dropdown list. To see samples of many fonts at once, visit
http://www.google.com/webfonts
.
 WARNING
:
WARNING
:
Different fonts are different sizes. The font you choose can impact the space needed for your category dropdowns. In other words, some fonts will take up more room and cause your dropdowns to take up more than one row. If you prefer to keep your categories on one row, try using a condensed font, or reorganize your top-level categories to fit the allotted space.
NRO Admin Panel: System / Configuration / NCR Retail Online / Theme Settings
Optionally adjust the colors used throughout your website, including the theme color (i.e., the accent color for buttons and highlights), header area colors, footer area colors, and content background color.
If you already know the color code (e.g., #FFFFFF for white), simply enter the number into the corresponding fields. Otherwise click the color wheel ( ) to select a color.
With the Celebrity theme, you have the option to accept multiple currencies and display the currency choices in your header area so shoppers can shop with the currency of their choice.
Allowing Multiple Currencies
NRO Admin Panel: System / Configuration / General Section / Currency Setup tab / Currency Options panel
Select
System / Configuration / Currency Setup / Currency Options
and select the allowed currency (or currencies) to display throughout your website. Also change your
Base Currency
and
Default Display Currency
if necessary.
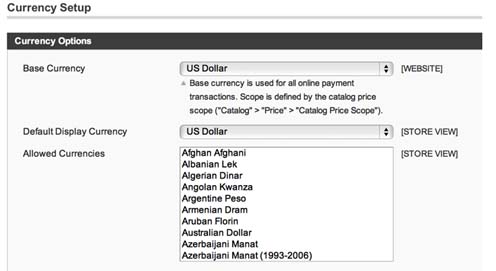 US Dollars
If you only support the US dollars, click on
US Dollar
in the
Allowed Currencies
field and nothing else.
Because there is only one currency available, no currency options will display in the header area of the Celebrity theme.
Multiple Currencies
If you support multiple currencies, hold down the
Ctrl
key (control key) and click on each currency you support in the
Allowed Currencies
field.
When using multiple currencies, the currency options will display in the header area of the Celebrity theme. Shoppers can simply click on the currency of their choice to change the shopping currency.
Configuring Multiple Currencies
Configure your global base currency in the NRO Admin Panel to match your Counterpoint currency. All other currencies are display-only conversions based the currency exchange rates that you control through the NRO Admin Panel.
The global base currency is used for all online payment transactions. If you have multiple web stores, you can change the scope of the currency in the
NRO Admin Panel
under
System / Configuration / Catalog / Price: Catalog Price Scope
.
NOTE:
The global base currency as defined in NRO must match your currency in Counterpoint.
NRO Admin Panel: CMS / Static Content Blocks
The header area includes a dynamic shopping cart that displays recently added items on hover, several default top links, and a logo area.
To edit your store logo, select the
Celebrity Theme - Store Logo
static block under
CMS / Static Blocks
and use the editor to upload your logo and format the header area.
NOTE
: The Celebrity theme does not use the default logo setting. Anything entered in the default logo field
Logo Image Src
under
System / Configuration / Design (Header section)
will be ignored. Instead, add your logo to the
Celebrity Store Logo
static block under
CMS / Static Blocks
.
The header area includes several default top links, including
My Account
,
My Wish List
,
Checkout
, and
Log In
. You can also optionally add a sign up link that allows shoppers to create an account on your site, and you can also add a custom link that points to a specific page on your site (for example, a new CMS page that displays
Store Locations
).
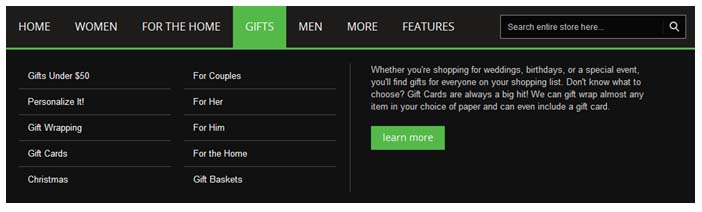
The dropdown navigation bar is included in the Celebrity theme and dynamically displays your Counterpoint categories and sub-categories (up to 4 levels deep).
NRO Admin Panel: System / Configuration / NCR Retail Online / Theme Settings
Optionally include a Home link in the navigation bar that automatically links back to your home page.
To add or hide the Home link in the navigation bar, edit the Celebrity theme's settings under
NRO Admin Panel: System / Configuration / NCR Retail Online Section / Theme Settings
tab. Expand the
Header
panel and choose
Yes
or
No
to display the
Show
Home Link (Navigation)
.

The dropdown navigation dynamically displays your categories and sub-categories (up to 4 levels deep) as defined in Counterpoint.
Any top-level categories defined in Counterpoint will automatically display in the dropdown navigation bar. If you have more categories than will fit, you can reorganize your categories in Counterpoint or shorten the names to make more room. After re-organizing your categories in Counterpoint, republish the data and your storefront will be updated accordingly.
If you have category descriptions defined in Counterpoint, you can optionally display the category descriptions and a ‘learn more' button that links to the corresponding category page.
To change these settings in the
NRO Admin Panel, select System / Configuration/ NCR Retail Online section / Theme Settings tab and edit the Navigation panel
according to your needs.
The search box is automatically included in the navigation bar.
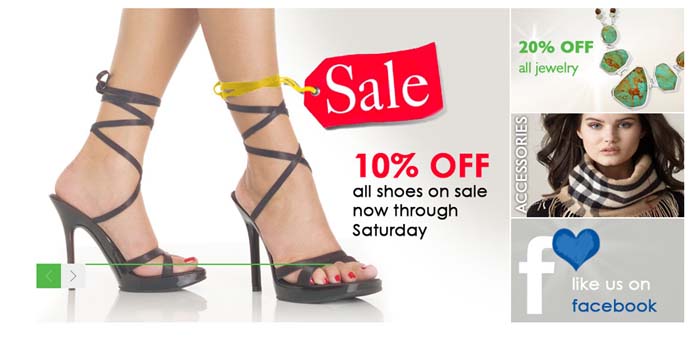
Immediately below the dropdown navigation, you can optionally display additional content based on your needs. For example, you might display the Customer Connect email signup form, additional navigation links, or highlight a special offer.
To edit the content of this section, select
CMS / Static Blocks
and select the block named
Celebrity Theme
–
Content Banner
(block identifier:
celebrity_content_banner
). If you do not wish to display this content block in your store, simply change the block's
Status
to
Disabled
.
TIP:
To display the Customer Connect signup form similar to the example shown above, copy and paste the following HTML code and modify accordingly. Be sure to update the encrypted account number value to match your own. Contact
support.customerconnect@ncrretailonline.com
for assistance locating this value.
WARNING
:
Be sure to update the encrypted account number value, below in red, to match your own.
<table style="width: 1010px;" border="0" cellspacing="10" cellpadding="10" align="center">
<tbody>
<tr>
<td style="font-size: 18px;">NEWSLETTER SIGN UP:</td>
<td><form id="radCCSubscribe" style="display: inline;" action="https://www.radiantretailapps.com/CustomerConnect/OptIn.aspx" method="post" target="_blank"><input id="email" style="display: inline; width: 190px; color: #9c9c9c; background-color: #dfdfdf;" value="enter your email" onfocus=value="" type="text" name="email" /> <input style="display: inline; vertical-align: baseline;" type="submit" value="Sign Up" /><input id="a" type="hidden" name="a" value="
FIhFKyVFU0STg8wg_OnNGw
" /></form></td>
<td>Sign up to receive new product announcements, coupons, special offers, and more!</td>
</tr>
</tbody>
</table>
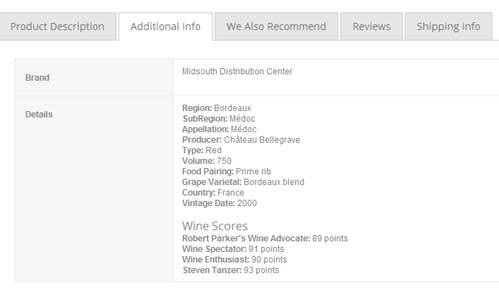
The Celebrity theme includes multiple tabs on the item detail pages. Tabs include:
-
Product Description:
Displays the item's long description as entered in Counterpoint
-
Additional Info:
Displays additional information for each product based on the item's attributes
-
We Also Recommend:
Displays product ‘up-sells' defined in the NRO Admin Panel
-
Reviews:
Displays customer ratings and reviews
-
Custom tab
: Display information that's common to all products on your site
Product Description
The product description is the primary source of information about your product. Enter the HTML long description in Counterpoint on the Ecommerce tab under Inventory / Items. The HTML description field supports HTML.
Additional Info
You can display additional information for each product based on the item's attributes.
In the NRO Admin Panel,
select Catalog / Attributes / Manage Attributes
and select the attribute you wish to modify, or create new product attributes to display on the
Additional Info
tab.
Removing Attributes from the Additional Info Tab
By default, the
Brand
attribute is the only attribute on the
Additional Info
tab. Brand displays the vendor name from Counterpoint as defined in the
Primary vendor
field in
Inventory / Items
.
 To remove
Brand
from the
Additional Info
tab, select
Catalog / Attributes / Manage Attributes
and select
Brand
. On the
Properties
tab in the
Frontend Properties
panel, change the
Visible
on
Product View
Page on
Front-end
field to
No
.
To remove
Brand
from the
Additional Info
tab, select
Catalog / Attributes / Manage Attributes
and select
Brand
. On the
Properties
tab in the
Frontend Properties
panel, change the
Visible
on
Product View
Page on
Front-end
field to
No
.
NOTE:
If no attributes are marked as visible on the front-end, the
Additional Info
tab will not display.
Adding Attributes to the Additional Info Tab
 To add an attribute to the Additional Info tab, select Catalog / Attributes / Manage Attributes and select the attribute you wish to display on the tab. On the Properties tab in the Frontend Properties panel, change the Visible on Product View Page on Front-end field to Yes.
NOTE:
The attribute must be included within a product's ‘attribute set' in order to display on the tab. See below for more information.
Working with Attribute Sets
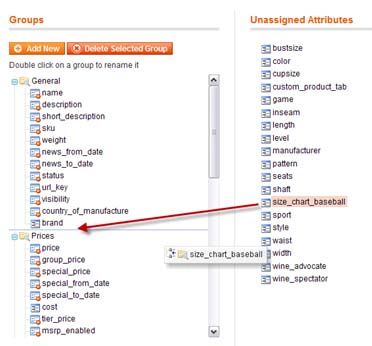 Each product is assigned to a single attribute set. An attribute set is a collection of attributes that are common to a group of similar products. Attributes can be grouped into sets so similar products can be created with the same attributes.
For example, clothing may be grouped under one attribute set with common attributes for color, size, size charts, inseams, etc., while wine may be grouped under a different attribute set with common attributes for region, variety, vineyard, wine score, etc.
You can display the common attributes for each grouping of similar products on the
Additional Info
tab by marking the individual attributes visible on the product view page and including the attributes within the appropriate attribute set.
To add an attribute to an attribute set, select
Catalog / Attributes / Manage Attribute Sets
and select the attribute set you wish to modify. Drag the unassigned attribute from the right column and drop it into an attribute group on the left. For example, to add a glove size chart to all baseball gloves, create an attribute named
size_chart_baseball
and then drag and drop
size_chart_baseball
into the
General
group of the
hand_size
attribute set. The new Size Chart field now displays on the
Additional Info
tab for all baseball gloves.
Once the
size_chart_baseball
attribute is included in the appropriate attribute set, select
Catalog / Manage Products
and select a baseball glove item. On the
General
tab, you will now see a new Size Chart field. Enter the size chart information for each baseball glove to display on the
Additional Info
tab.
Creating New Product Attributes
An attribute is defined as
any property of a product.
This includes the product ID, product title, SKU, images, description, and anything that helps differentiate one product from another.
Learn more about creating new attributes here:
http://www.magentocommerce.com/knowledge-base/entry/tutorial-creating-attributes-custom-fields
.
We Also Recommend (Up-Sells)
Up-sells are items that your shoppers would ideally buy instead of the product they're viewing. They might be better quality, produce a higher profit margin, be more popular, etc.
To define one or more products to include on this tab, select
Catalog / Manage Products
and select the product for which you want to define up-sells. On the
Up-sells
tab, select one or more products to display on the
We Also Recommend
tab.
NOTE:
If no up-sells are defined for a specific product, this tab will not be displayed.
Reviews
Shoppers can rate each product and write reviews. Before the reviews go live, you have a chance to approve or reject each review in the NRO Admin Panel under
Catalog / Ratings and Reviews / Customer Reviews / Pending Reviews
. Approved reviews will automatically display on the
Reviews
tab.
Custom Tab

Display a tab of additional information that's common to all products on your site. This tab will display the same information for all products.
To edit the tab name and content, select
CMS / Static Blocks
and select the block named
Celebrity Theme – Custom Tab
(block identifier
celebrity_custom_tab
). In the
Block Title
field, enter the name of the tab to display in your store (e.g.,
Shipping Info
). In the
Content
section, add the text or images you wish to display on the tab. If you do not wish to use this custom tab, simply change the block's
Status
to
Disabled
.
Below the tabbed item details area, you can optionally display additional content that's common to all products. For example, you might display general shipping information, an email signup form, or highlight a specific coupon code or special offer.
To edit the content of this block, select
CMS / Static Blocks
and select the block named
Celebrity Theme – Global Product Message
(block identifier:
celebrity_after_tabs
). If you do not wish to display this content block in your store, simply change the block's
Status
to
Disabled
.
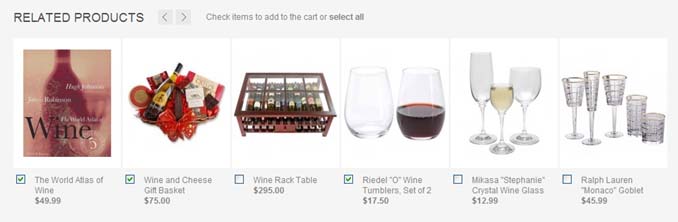
Below the informational content block, you can optionally display related products. Related products are meant to be purchased in
addition
to the item the customer is viewing.
Items defined as
Substitute Items
in Counterpoint will be imported into NRO and automatically display as related products. Only the first two substitute items from Counterpoint will display online. You can add additional related products through the NRO Admin Panel.
To define one or more related products in the NRO Admin Panel, select
Catalog / Manage Products
and select the product for which you want to define related products. On the
Related Products
tab, select one or more items to display. If you select more than six related products (or more than four related items plus two substitute items), the related products section will show the first six items plus a scrolling feature with arrows to allow the shopper to view more.
NRO Admin Panel: System / Configuration / NCR Retail Online section / Theme Settings tab
Choose between the simple or informative footer.
It’s possible to add a page background via CSS. Let’s say you wanted to change the light gray background of the Celebrity theme to use a background texture image (named bg-grey.gif in this example), instead of a solid color.
Here’s one possible way to do this, using the Admin Panel web site:
1) Upload the background image
a. Go to the CMS / Pages menu, and open any existing page don’t worry, you won’t be saving any changes to that page itself
b. On the Content tab, click the Insert Image button to open the Image Management tool
c. Click the Browse Files button
d. Locate the file bg-grey.gif on your local system, and click Open
e. Click the Upload Files button to upload this image to the server (this will upload the file to your /media/wysiwyg folder).
2) Go to System / Configuration, in the Design section, on the HTML Head tab, and enter the following in the Miscellaneous Scripts field (be sure to click the Save Config button to save your change):
<style>
.header-container { background: transparent url(/media/wysiwyg/bg-grey.gif) !important; }
.main-container { background: transparent url(/media/wysiwyg/bg-grey.gif) !important; }
.footer-container { background: transparent url(/media/wysiwyg/bg-grey.gif) !important; }
</style>
If you only want to change the background of the light gray area and not the footer section, just leave out the .footer-container line.
Here is some CSS that doesn't tile the backgroud (note that the body background color would need to match the bottom color of the background image to avoid a visible seam):
<style>
.header-container { background: transparent !important; }
.main-container { background: transparent !important; }
.footer-container { background: transparent !important; }
body { background: #000000 url(/media/wysiwyg/page-background.jpg) no-repeat left top !important; }
</style>
Long-term, we will have a way that you guys can FTP files and styles directly to your Media folder. This is a short-term solution.
The recommended image sizes outlined in this section are specific to the Celebrity theme. Other themes may have different recommendations for image sizes.
While most of the images sizes used throughout the Celebrity theme can be changed according to your needs, here are the recommended sizes as used in the NRO Demo Store:


In most cases, item images will be resized according to the page on which they are currently displayed.
By default, the container that holds the product image is a rectangle with a 3 to 4 ratio. However, regardless of their size or shape, images are automatically resized to fit the width of the container, which makes it possible to upload a single image and assign it to all three types.
Best Practices
Start with the largest image size, which is the zoom image (for example, 664w x 800h). Upload the large image, and it will be scaled down proportionally according to the page on which it is displayed.
Item Image Details
|
Zoom Image
|
Image Details
-
Recommended size:
664w x 800h (can be larger or smaller); for best results, images should be proportional to the recommended size (i.e., a 3:4 ratio), for example:
- 830w x 1000h
- 664w x 800h
- 498wx 600h
-
Where it displays:
Displays on item detail pages when you hover over the item image. If you do not wish to use image zooms for your products, make sure your images don't exceed the recommended size for the base image.
-
Where to upload:
To use the built-in image zoom feature, simply upload a base image that's larger than the recommended base image size (360w x 434h). As long as the uploaded base image is larger than the recommendations, the image zoom will display automatically.
|
|
Base Image
|
Image Details
?
Recommended size:
360w x 434h (or larger if you want to utilize the built-in image zoom features)
?
Where it displays:
Displays on item detail pages
?
Where to upload:
In most cases, you will start with the largest image size (which is the zoom image) and NRO will automatically create the smaller images as needed.
|
|
Small Image
|
Image Details
-
Recommended size:
232w x 280h
-
Where it displays:
Displays on category landing pages, search results page, up sells, cross sells, and new product lists
-
Where to upload:
In most cases, you will start with the largest image size (which is the zoom image) and NRO will automatically create the smaller images as needed.
|
|
Thumbnail
|
Image Details
-
Recommended size:
86w x 104h
-
Where it displays:
Displays on the thumbnail gallery, shopping cart page, cart dropdown*, and in some blocks such as Related Items
-
Where to upload:
In most cases, you will start with the largest image size (which is the zoom image) and NRO will automatically create the smaller images as needed.
* Images in the cart dropdown will be automatically resized to 50w x 60h.
|
NRO Admin Panel: System / Configuration / Catalog section / Catalog tab / Product Image Placeholders panel
You can optionally upload your own image to use as the default placeholder image for any products that do not yet have images:
1. In the NRO Admin Panel, select
System / Configuration / Catalog section / Catalog tab
and expand the
Product Image Placeholders panel
.
2. For each image type (Base Image, Small Image, and Thumbnail), click the
Browse
button to upload a new placeholder image. You can use the same image or different images for each type:
TIP:
Image zooms work for placeholder images the same way they do for regular item images. To use zooms on your placeholder image, simply upload a Base Image placeholder that's larger than the recommended size (360w x 434h). As long as the uploaded image is larger than the recommendations, the image zoom will display automatically.
Recommended image sizes for the placeholder images are the same as for item images (detailed in the previous section).
NRO Admin Panel: System / Cache Management
If you make changes in the NRO Admin Panel but the changes are not reflected in your storefront, try clearing your cache!
The cache is a temporary storage area where frequently accessed data can be stored for rapid access. Many websites utilize caching to speed up the processing and loading of the content. When data is stored in the cache, it can be used in the future by accessing the cached copy rather than re-downloading or reprocessing the original data.
Clearing the cache refreshes the out-of-date information that's stored in the cache and replaces it with the new content.
Front-End Cache
Front-end changes typically include updates to images, CSS files, or other front-end content.
To clear the front-end cache:
-
Press F5 in your browser window (this may differ on some browsers).
Back-End Cache
Back-end changes typically include changes to settings in the NRO Admin Panel, PHTML files, XML files, installing an extension, or other back-end content.
To clear the back-end cache:
-
In the NRO Admin Panel, select
System / Cache Management
.
-
Check the box next to any of the Cache Types that indicate they need to be updated. Alternatively, you can Select All and refresh all Cache Types.
-
In the
Actions
dropdown (located in the upper right corner of the Cache Types list), select
Refresh
and then click the
Submit
button.

NRO Admin Panel: System / Configuration
Problem:
When saving your configuration settings in the NRO Admin Panel, you receive an error message "An error occurred while saving this configuration…”
You will receive a similar error message if you enter invalid theme information – for example, if you enter the name of a package or theme that doesn't exist.
Solutions:

|


 Add Comment











 Subscribe to Article
 Print Article
 Email Article to Friend
 Export to MS Word